CircuitVerse for Educators
While understanding and learning the concepts of digital circuit design, students must learn through simulation of daily engineering tasks, including design verification and testing. This section highlights how educators can use the CircuitVerse tool as an educational tool for managing student groups, assignments, and grades in one place (refer to Figure 2.2). Some of the key workflows available within the CV tool include:
- Create different student groups for different coursework
- Add mentors to different student groups
- Add members to different student groups
- Add assignments for student groups while managing the deadlines and the grading scale
- Grade assignments for different student groups
- Embed interactive circuits using iframe within different web pages.
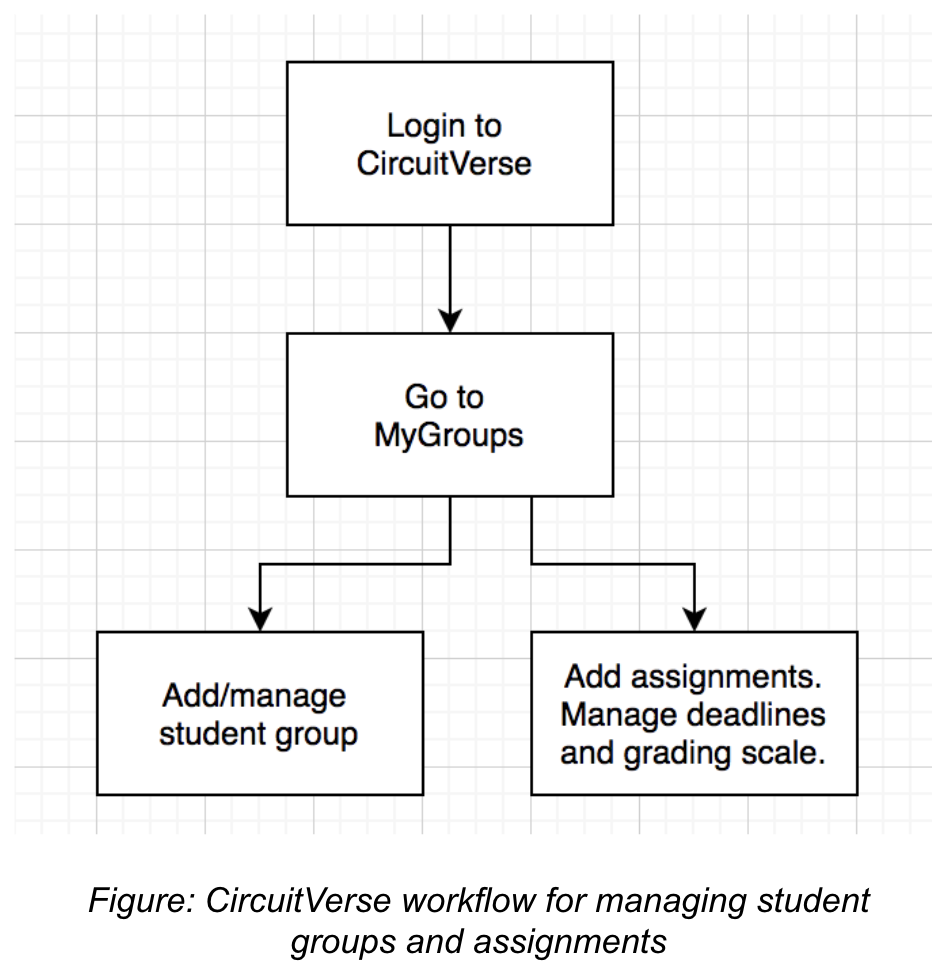 Figure 2.2: CircuitVerse workflow for managing student groups and assignments
Create Groups
After successfully logging into your account, follow the below steps to create a group:
-
Navigate to your account displayed in the upper right-hand corner of your screen. (Refer to Figure 2.3)
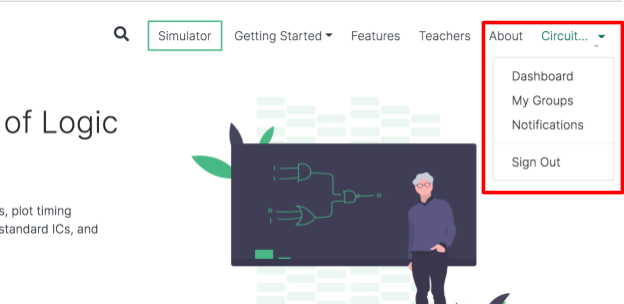 Figure 2.3
 -
Click on My Groups to display the GROUPS page as shown in Figure 2.4.
 Figure 2.4
 -
Click on the +Make New Group button to display the NEW GROUP: page. Refer to Figure 2.5.
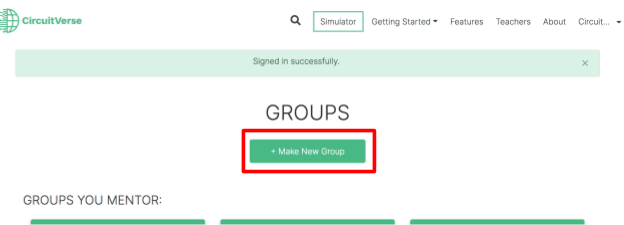 Figure 2.5
 -
Enter a name for your new group in the Group Name: text field. Refer to Figure 2.6.
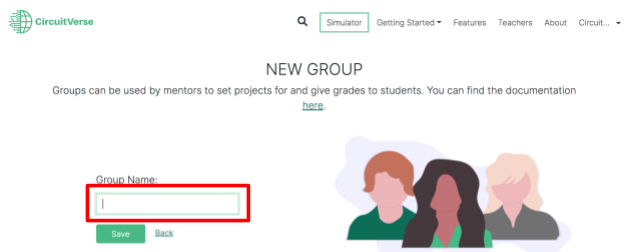 Figure 2.6
 -
Click Save to complete the process. Refer to Figure 2.7.
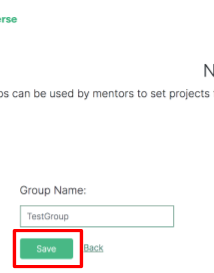 Figure 2.7
 -
Once a new group is successfully created, a successful group creation message (as shown in Figure 2.8) is displayed on the GROUPS page.
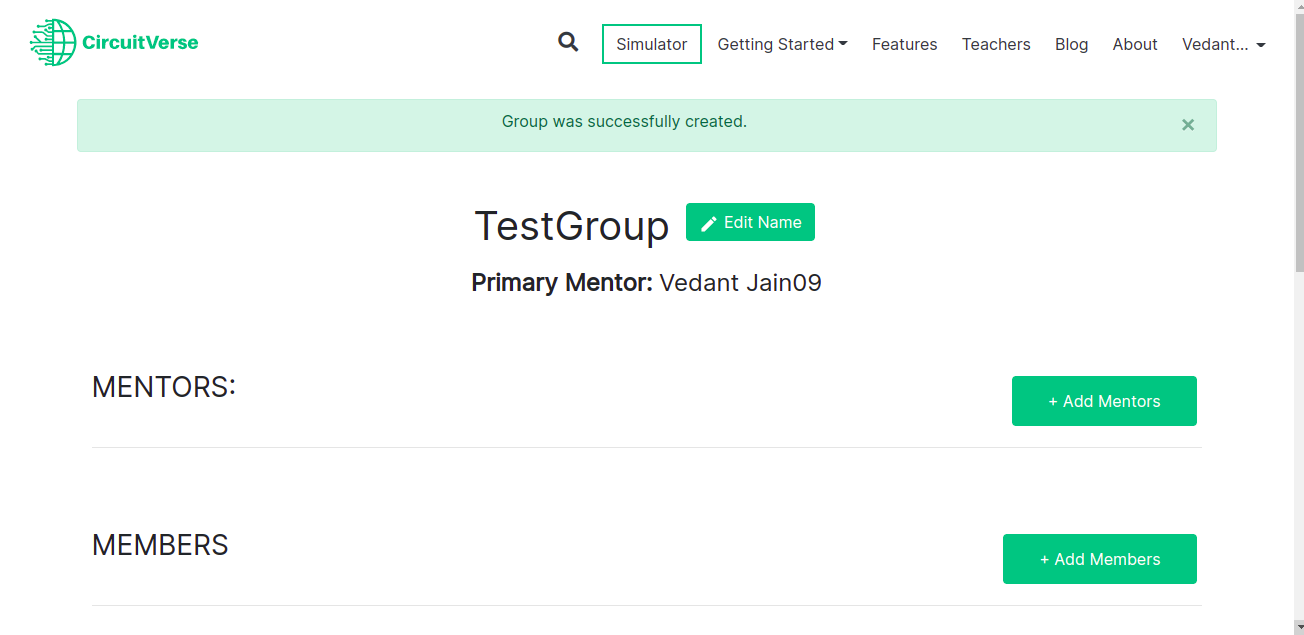 Figure 2.8
Additionally, a successful group creation message is sent to the registered email address.
Add Group Mentors
This section highlights the different steps for adding mentors to a group.
Follow the below steps to add group mentors to a selected group:
-
Navigate to Login displayed in the upper right-hand corner of your screen and log in to the portal. (Refer to Figure 2.9)
Figure 2.9 -
Click on My Groups to display the GROUPS page as shown in Figure 2.10. This page lists the different groups you are associated with.
Figure 2.10 -
Select the group to which you wish to add your mentors and click on the View icon (refer to Figure 2.11) to display the next page for adding members and assignments.
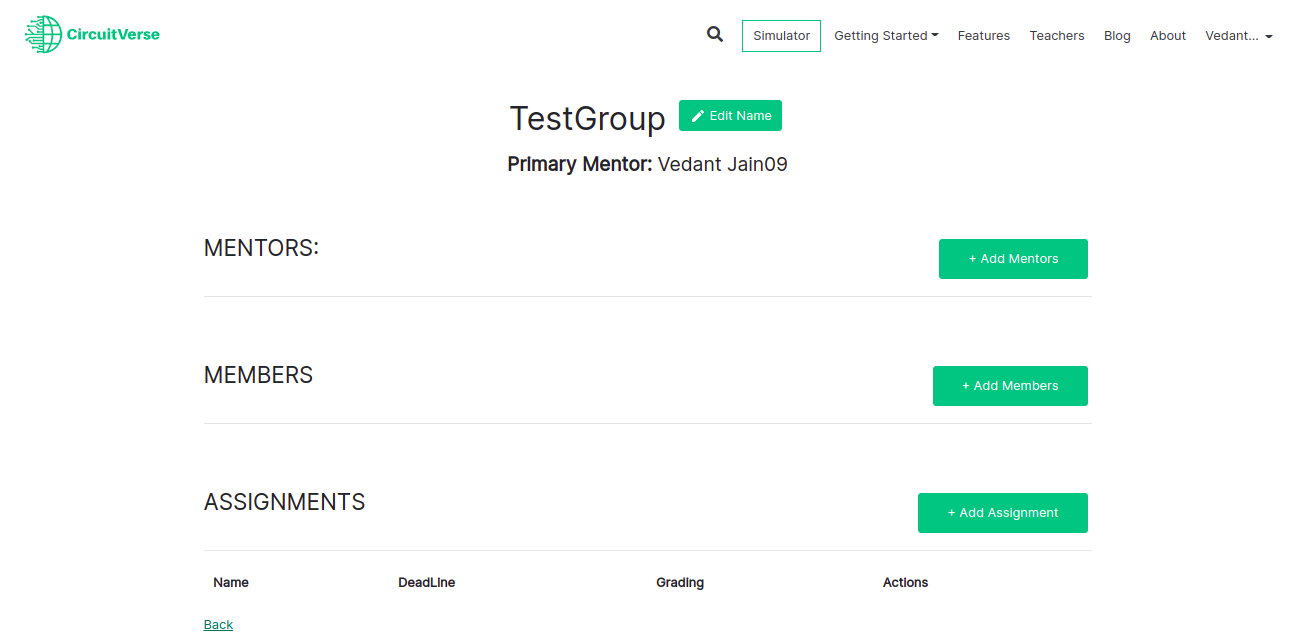 Figure 2.11
 -
Click on the +Add Mentors button to add mentors to the selected group. An Add Mentors pop-up window is displayed (refer to Figure 2.11.1).
 Figure 2.11.1
 -
Enter email IDs separated by commas, spaces, or list them individually in separate lines in the Email IDs: text field box. Refer to Figure 2.11.2.
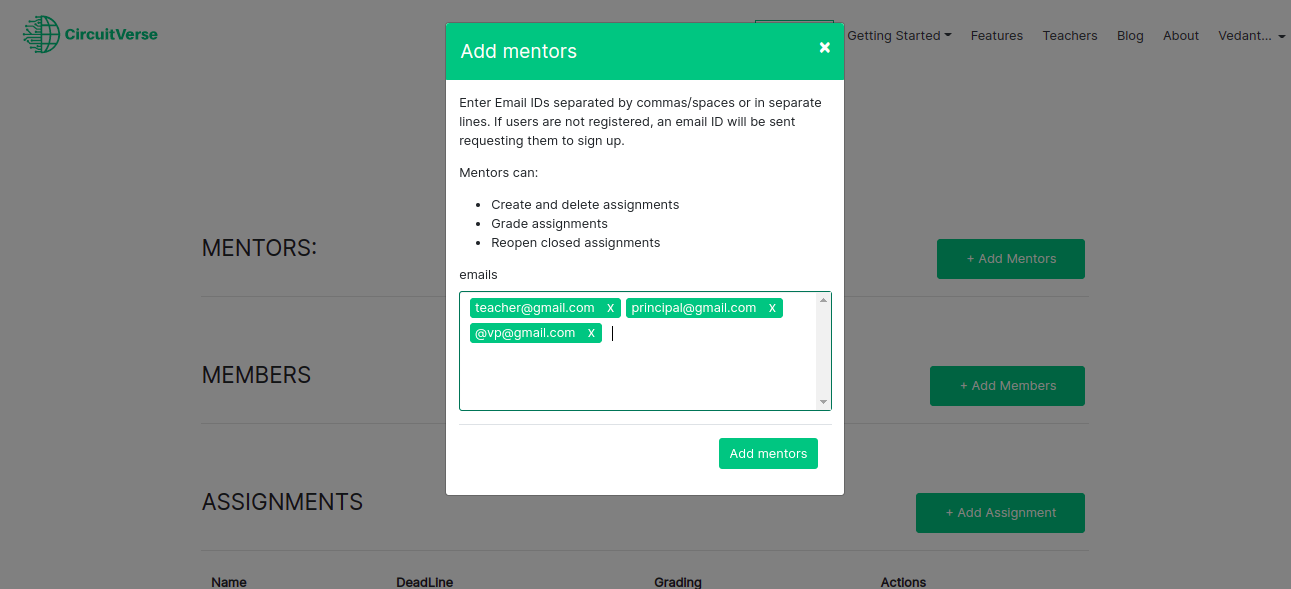 Figure 2.11.2
 -
Click on Add mentors to complete the process. Refer to Figure 2.11.3.
 Figure 2.11.3
 -
The group mentors will be listed in the MENTORS section. Refer to Figure 2.11.4.
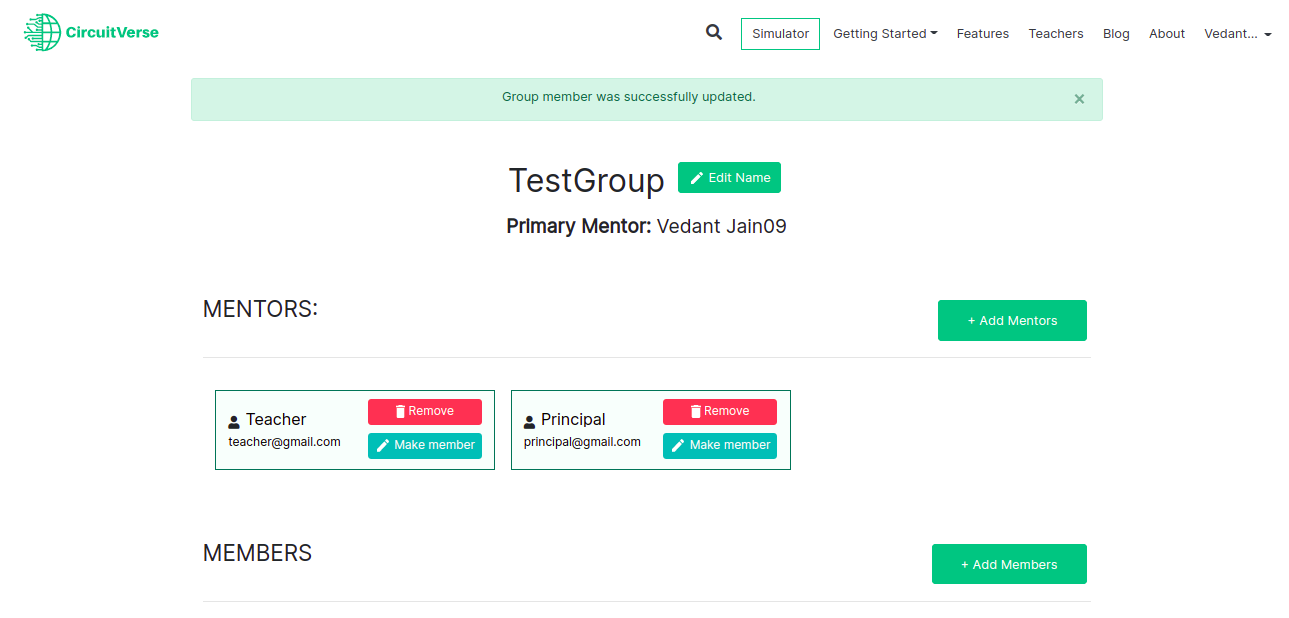 Figure 2.11.4
NOTE: If a mentor is already registered with CircuitVerse, the mentor will be added automatically. Alternatively, the mentor receives an email invitation to register with CircuitVerse. Once the mentor completes the registration process, they will be automatically added/listed to the group.
Add Group Members
This section highlights the different steps for adding members to a group.
Follow the below steps to add group members to a selected group:
-
Navigate to Login displayed in the upper right-hand corner of your screen and log in to the portal. (Refer to Figure 2.9)
Figure 2.9 -
Click on My Groups to display the GROUPS page as shown in Figure 2.10. This page lists the different groups you are associated with.
Figure 2.10 -
Select the group to which you wish to add your students and click on the View icon (refer to Figure 2.11) to display the next page for adding members and assignments.
Figure 2.11 -
Click on the +Add Members button to add members to the selected group. An Add Members pop-up window is displayed (refer to Figure 2.12).
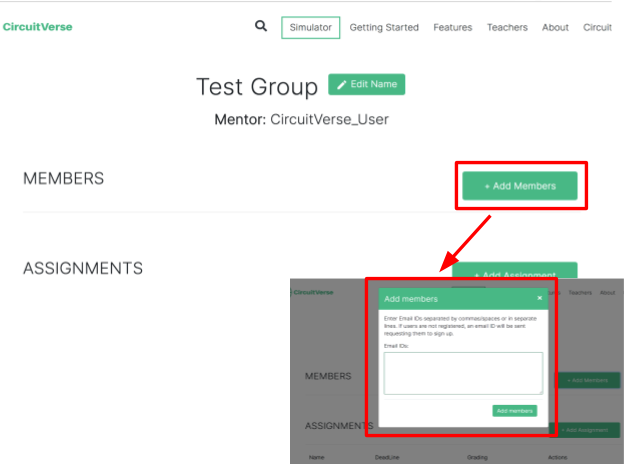 Figure 2.12
 -
Enter email IDs separated by commas, spaces, or list them individually in separate lines in the Email IDs: text field box. Refer to Figure 2.13.
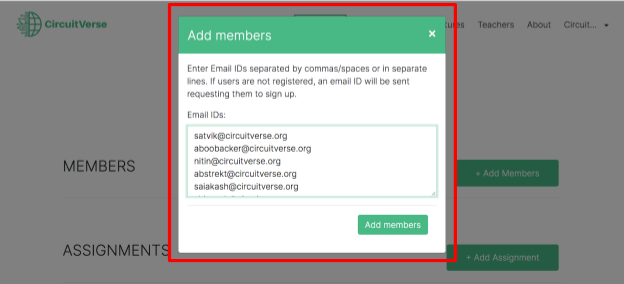 Figure 2.13
 -
Click on Add members to complete the process. Refer to Figure 2.14.
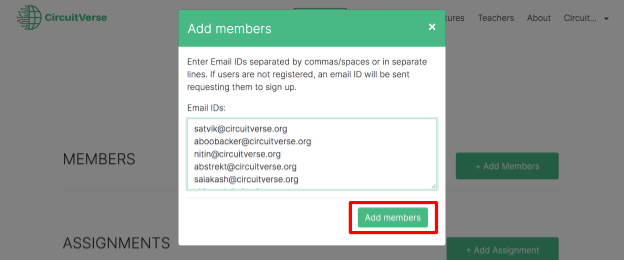 Figure 2.14
 -
The group members will be listed in the MEMBERS section. Refer to Figure 2.15.
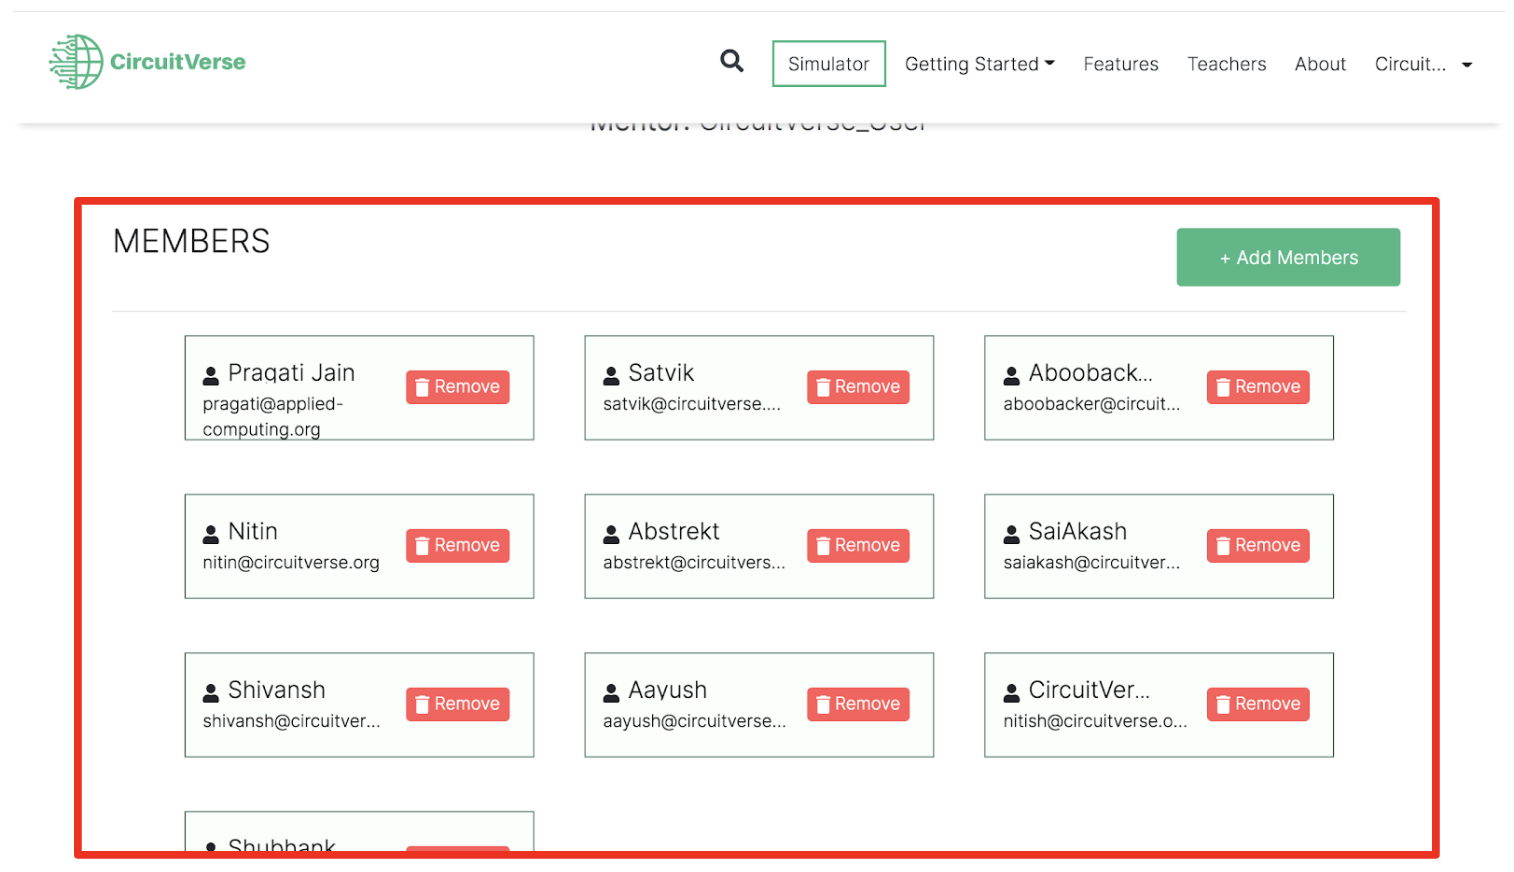 Figure 2.15
NOTE: If a student is already registered with CircuitVerse, the student will be added automatically. Alternatively, the student receives an email invitation to register with CircuitVerse. Once the student completes the registration process, they will be automatically added/listed to the group. Refer to Figure 2.16.

Switch Roles
This section describes how to switch roles, i.e., mentor to member or member to mentor.
Member to Mentor
-
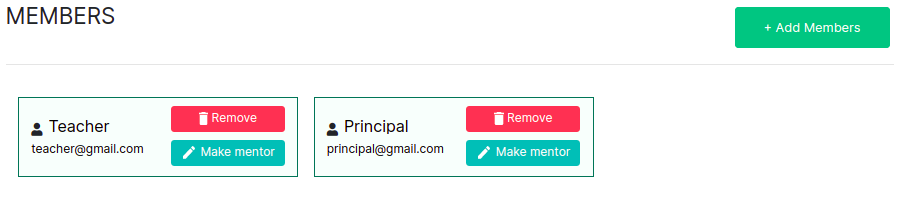
All members are listed under the MEMBERS section.
-
Click on the Make mentor button in the desired member's container.

-
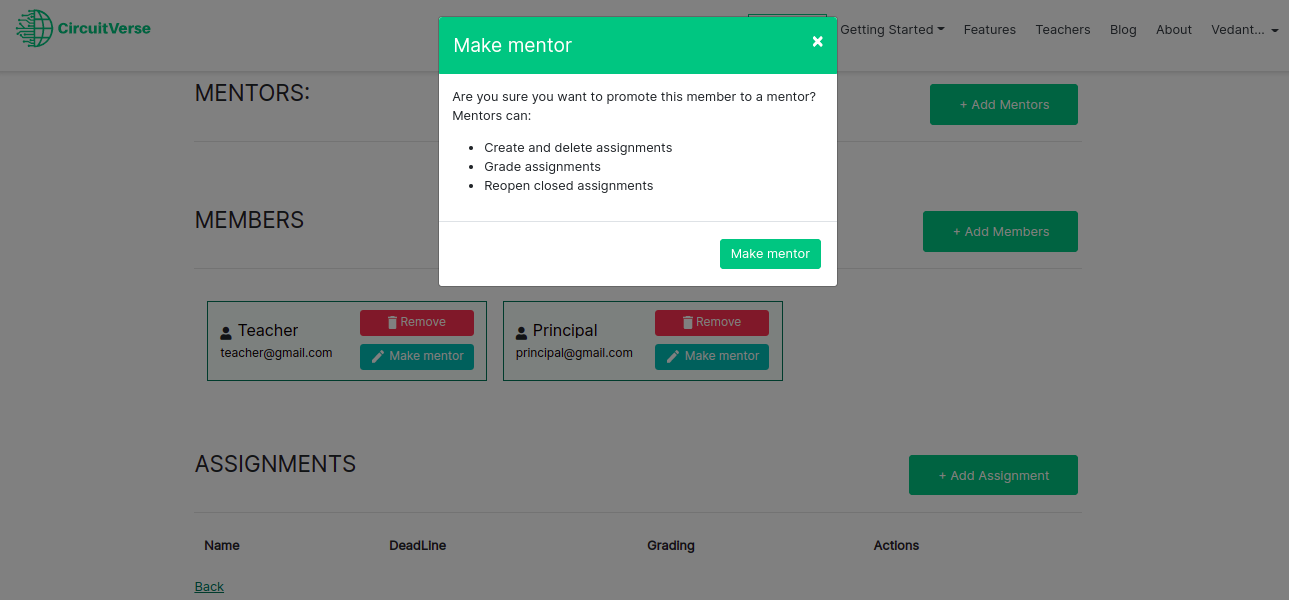
A popup will be displayed for confirmation; you can check the mentor accessibilities.
-
Click on Make mentor and you're all done!

Mentor to Member
-
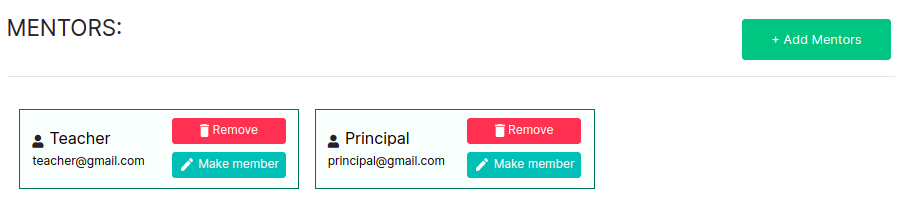
All mentors are listed under the MENTORS section.
-
Click on the Make member button in the desired mentor's container.

-
A popup will be displayed for confirmation; you can check the member accessibilities.
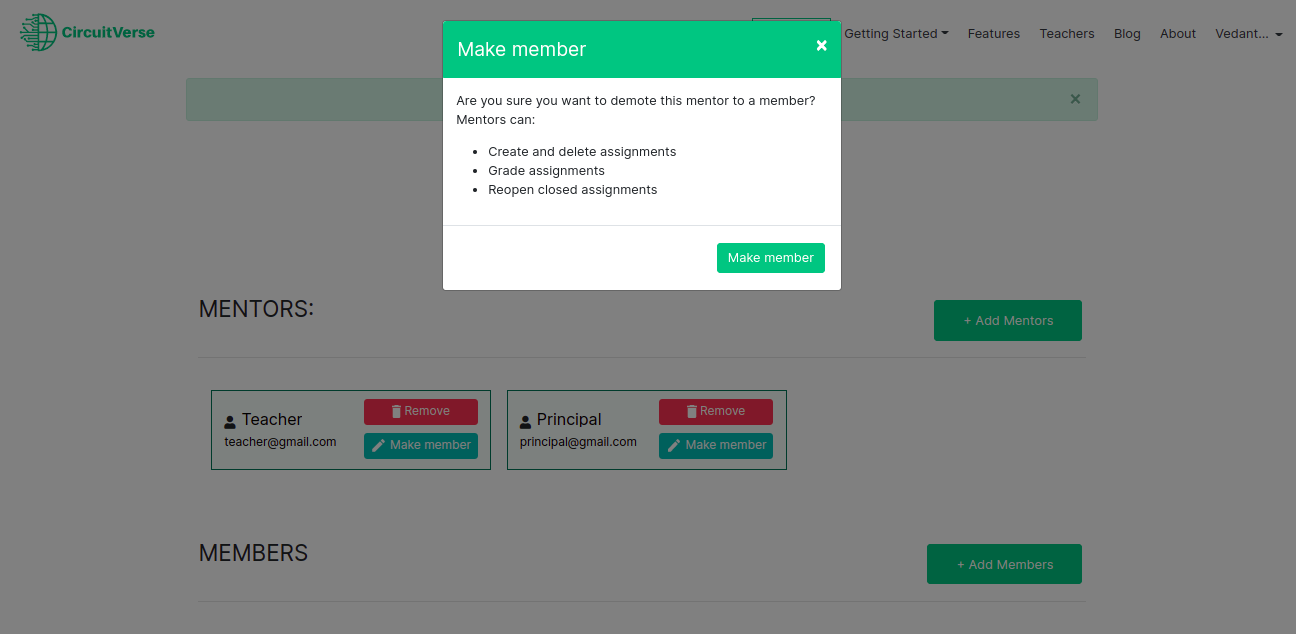
-
Click on Make member and you're all done!

Add Assignments
Assignments can be successfully added for different groups while managing the deadlines and the grading scale. While describing the assignment in the description box, any elements relevant to the assignment may be disabled using a toggle button. The grading scale must be identified during the initial setup, although the grades can only be added when the deadline has passed. If needed, after the deadline has passed, an assignment can be reopened.
NOTE: An assignment can only be viewed by group members if they are part of the group.
Follow the below steps to add assignments for a selected group:
-
Navigate to your account displayed in the upper right-hand corner of your screen. Refer to Figure 2.17.
Figure 2.17 -
Click on My Groups to display the GROUPS page as shown in Figure 2.18. This page lists the different groups you are associated with.
Figure 2.18 -
Select the group to which you wish to add assignments and click on the View icon (refer to Figure 2.19) to display the next page for adding members and assignments.
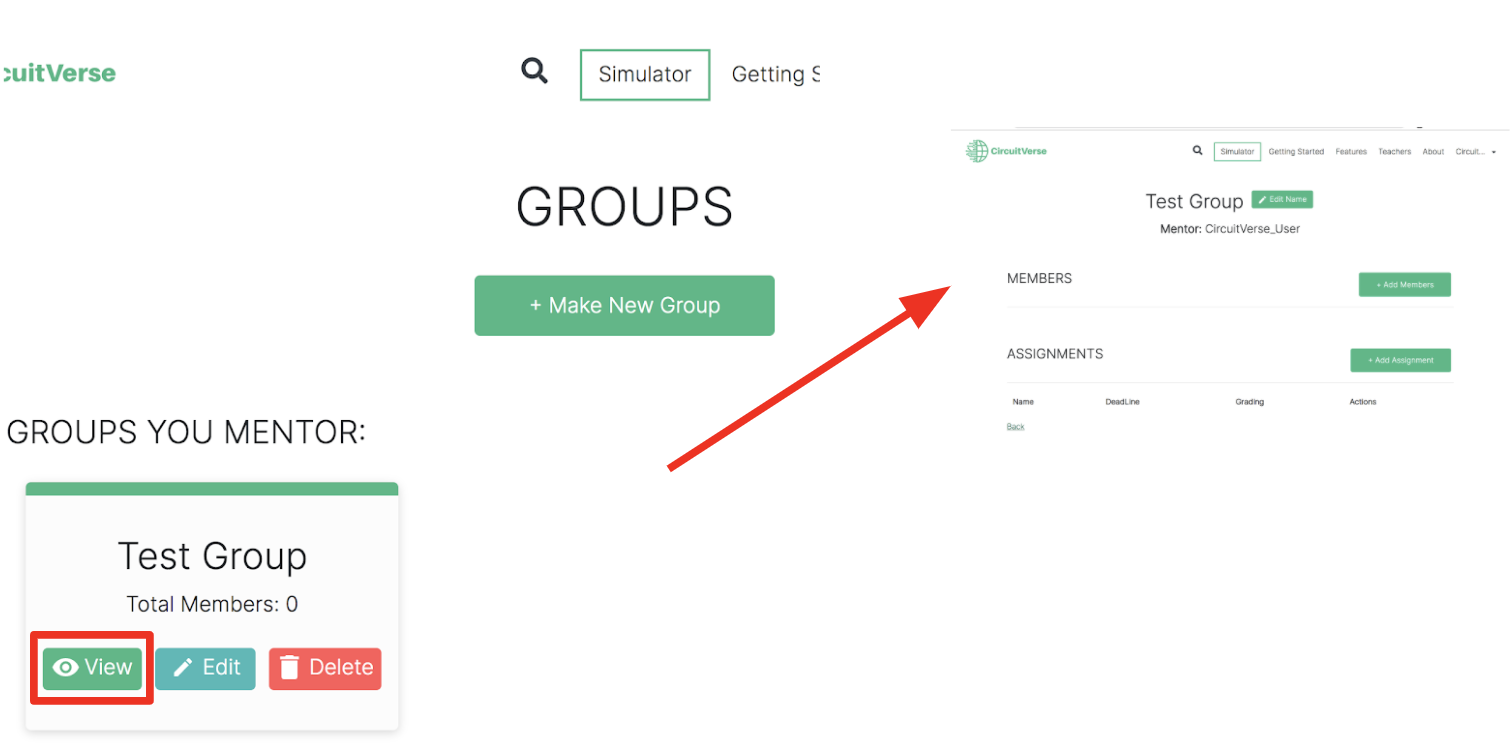 Figure 2.19
 -
Navigate to the Assignments section and click on the +Add Assignment button to display the New Assignment page as shown in Figure 2.20.
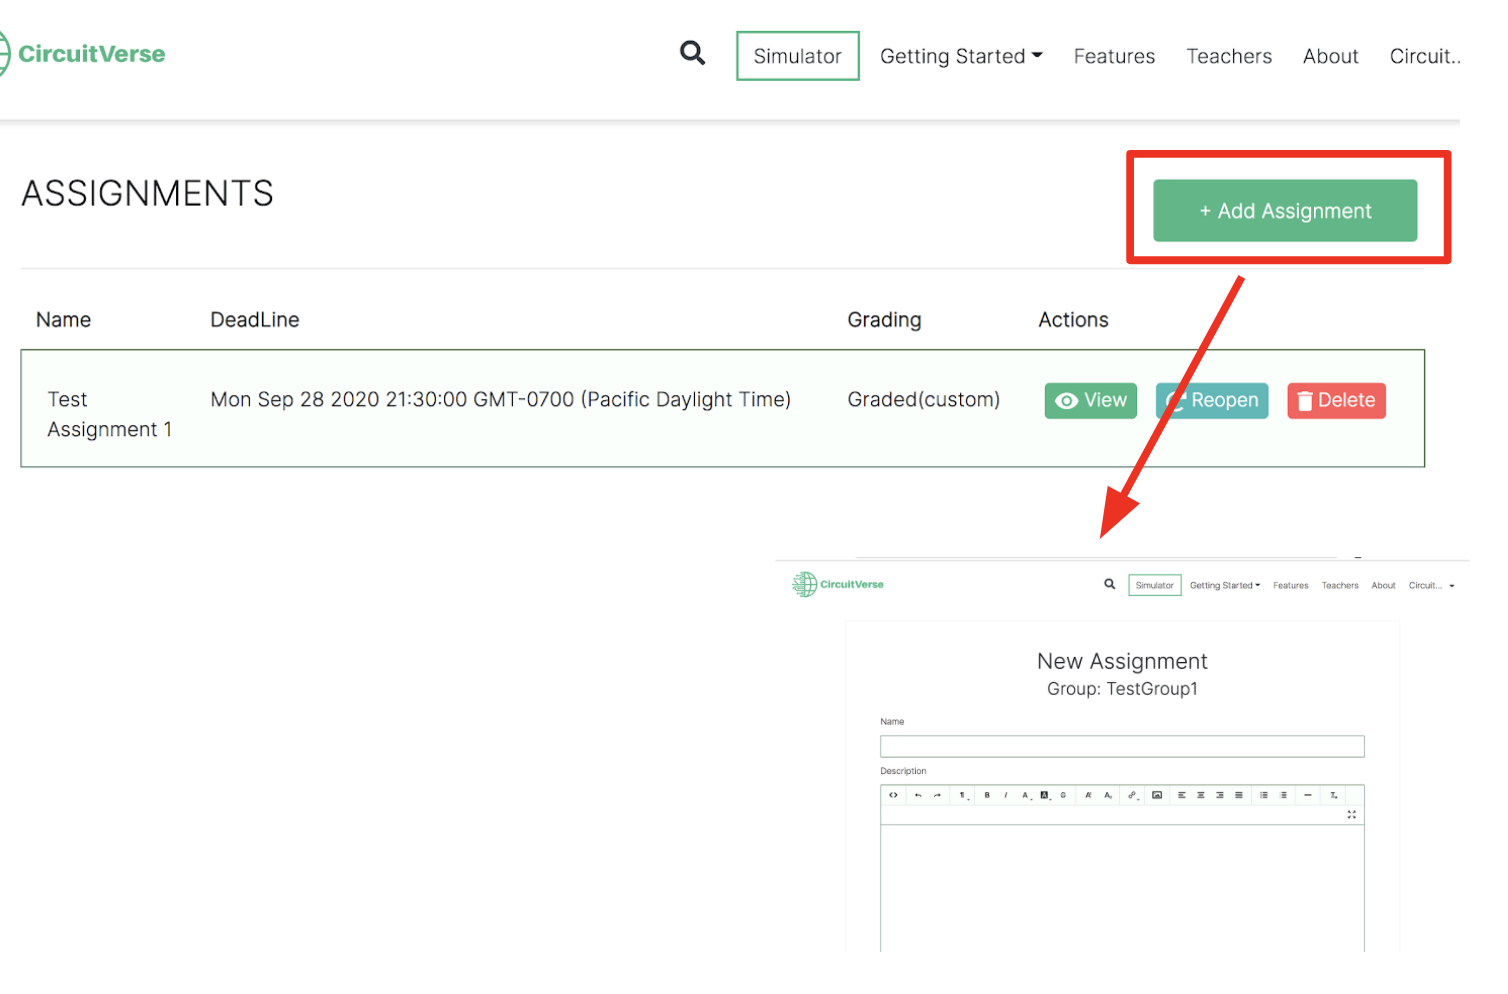 Figure 2.20
 -
Enter a name for the assignment in the Name text field as shown in Figure 2.21.
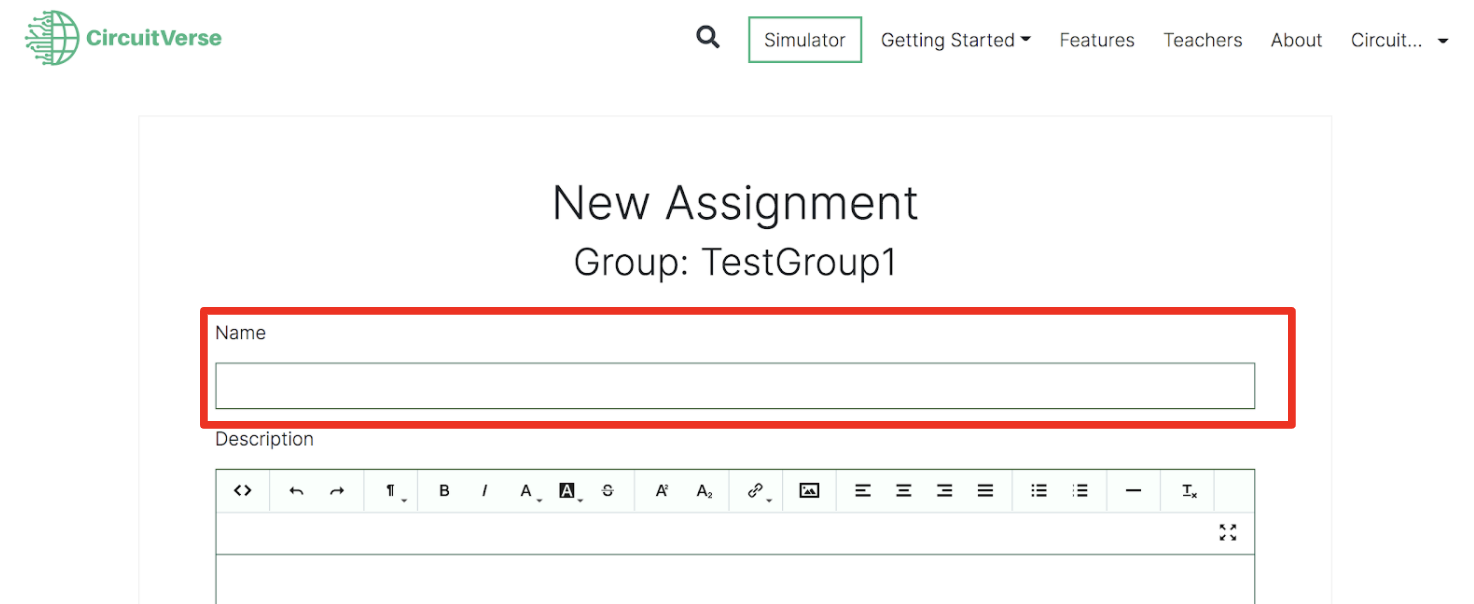 Figure 2.21
 -
Enter a brief description of the assignment in the Description text field as shown in Figure 2.22.
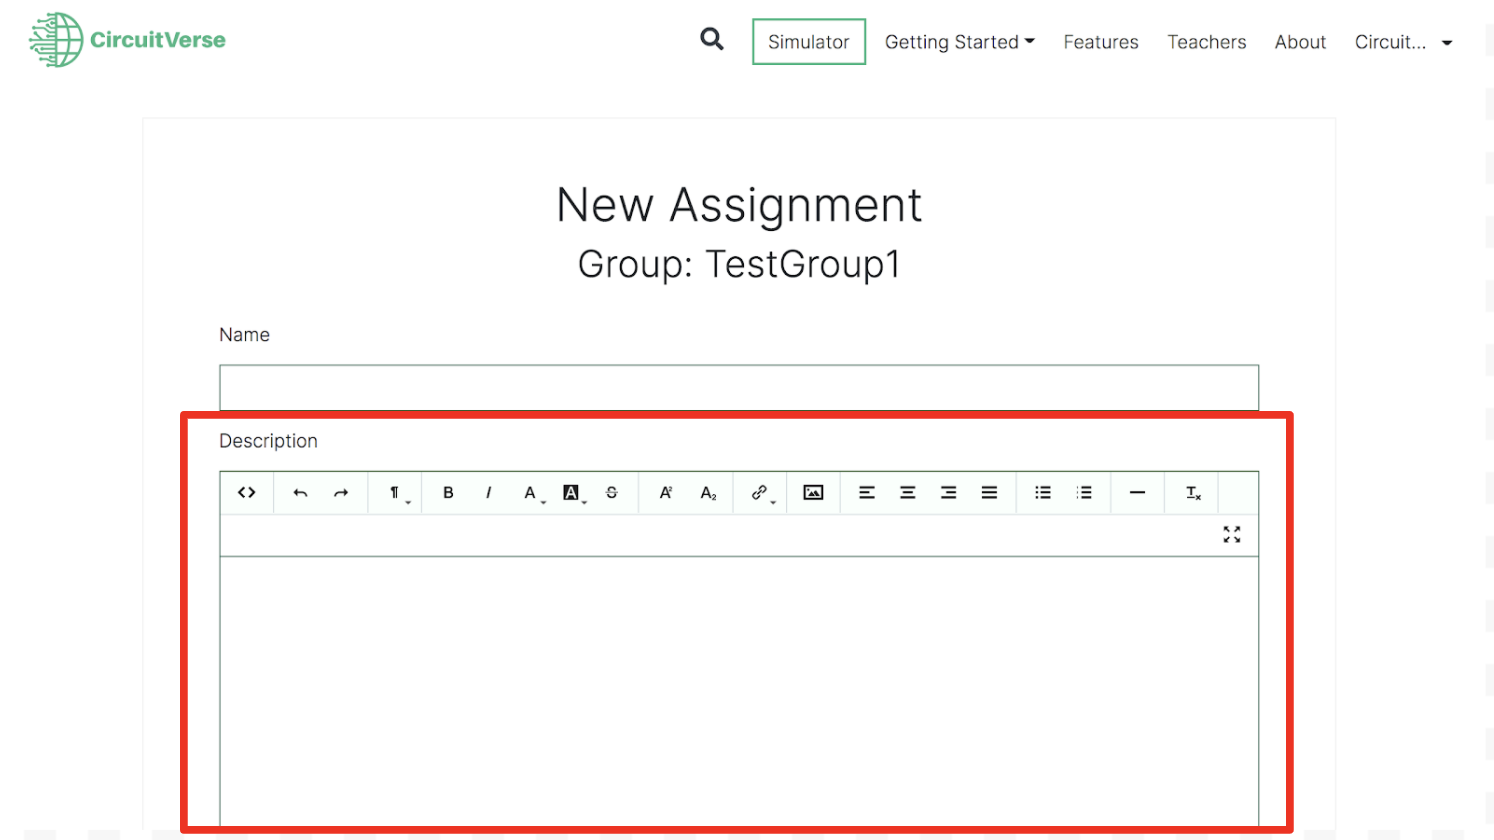 Figure 2.22
 -
Enter a timestamp for the assignment deadline in the Deadline text field as shown in Figure 2.23.
 Figure 2.23
 -
Choose a grading scale from the Grading scale drop-down menu as shown in Figure 2.24. Refer to Table 2.2 for a brief description of the different grading scales available within the CircuitVerse simulator.
NOTE: A grading scale can be set only once while adding the assignment.
NOTE: Grades can only be added for a student assignment after the deadline has passed.
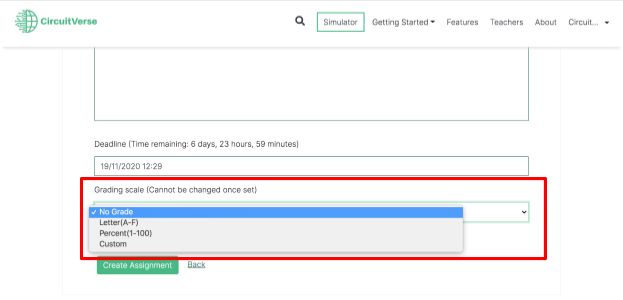 Figure 2.24
Table 2.2: Brief description of the grading scales
Name Description No Grade Default value. No grading scale has been assigned for the relevant assignment. Letter (A-F) Grades can be assigned with any of the letters A, B, C, D, E, or F. Percent (1-100) Grades can be assigned as a percentage from 1 to 100. Custom Grades can be a custom text or number. -
If needed, click the Enable Elements Restriction toggle button to display the list of elements that will be disabled for group members working on the assignments. Refer to Figure 2.25.
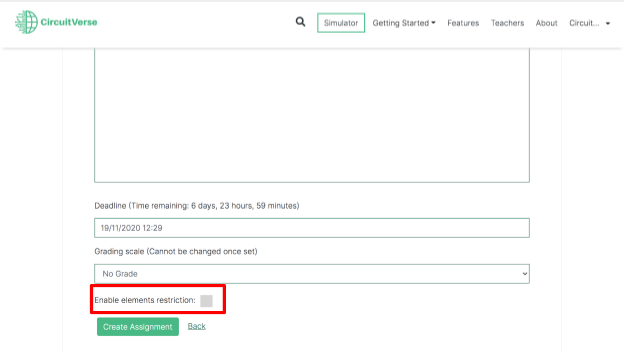 Figure 2.25
 -
Click the Create Assignment button to complete the process (refer to Figure 2.26). The new assignment will be listed under the ASSIGNMENTS section.
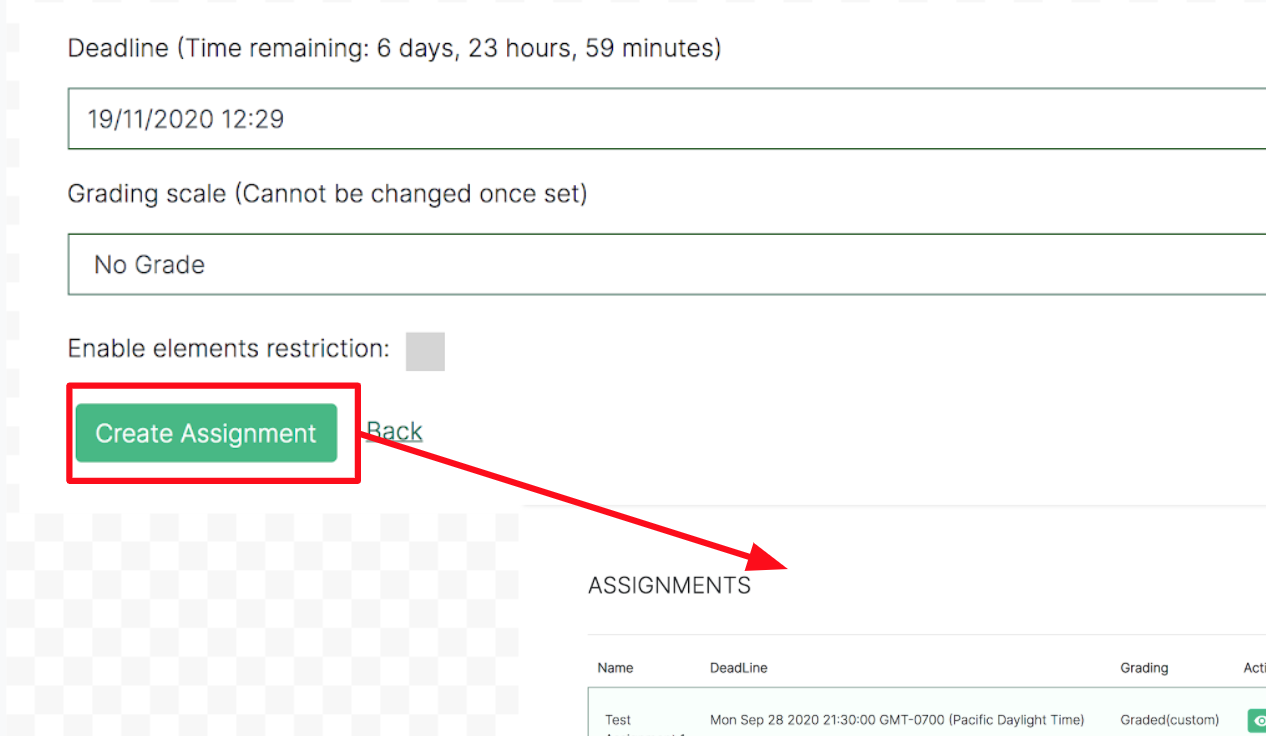 Figure 2.26
Once an assignment has been successfully added, different tasks can be performed for an assignment with an active or inactive deadline (refer to Figure 2.27). For instance, any assignment with a passed deadline can be reopened. Table 2.3 provides a quick description of the different tasks available for managing assignments.
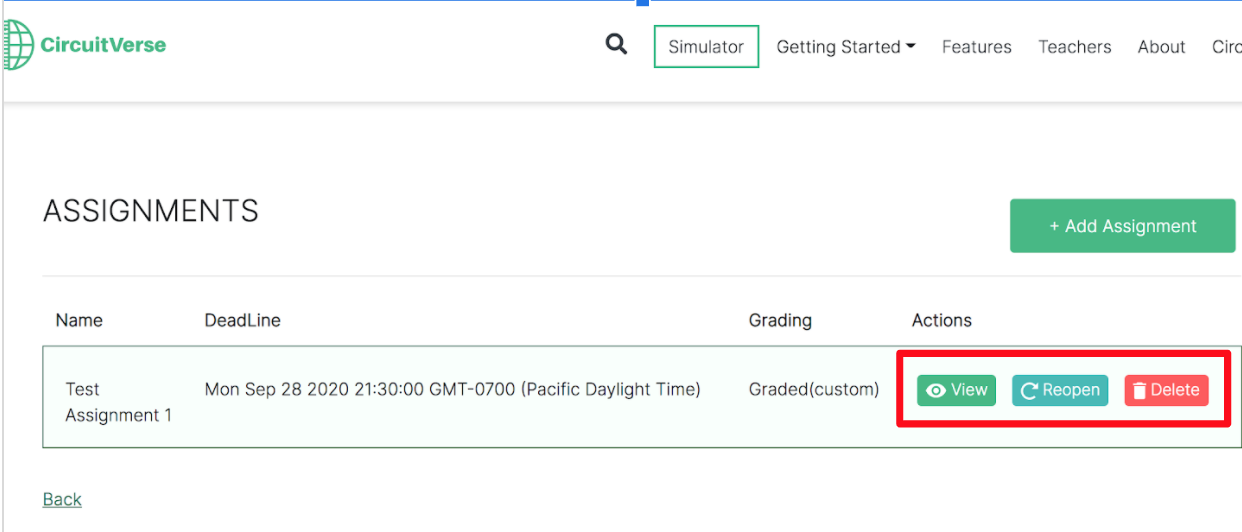 Figure 2.27
Table 2.3: Different tasks for managing assignments
Task Description View Displays assignment details and submissions for the relevant assignment. The group mentor can edit assignment details and add, update, or export grades for a selected assignment. Reopen Reopens an assignment with a passed deadline. Edit Allows a group mentor to update assignment details for an active deadline. Delete Deletes the relevant assignment.
Manage Grades
The grading criteria for any assignment can only be identified once while adding an assignment. Once an assignment has been added and the deadline has passed, grades can be added, updated, or exported for different student submissions. Figure 2.28 displays the grading criteria drop-down menu, and Table 2.4 shares a brief description of the different grading criteria.
NOTE: Assignments can be graded within CircuitVerse only after the deadline has elapsed.
Table 2.4: Different grading criteria within CircuitVerse
| Grading Criteria | Description |
| No Grade | Default value. No grading scale has been assigned for the relevant assignment. |
| Letter (A-F) | Grades can be assigned with any of the letters A, B, C, D, E, or F. |
| Percent (1-100) | Grades can be assigned as a percentage from 1 to 100. |
| Custom | Grade can be a custom text or number. |
Add or Update Grades
After the grading scale has been set and the assignment deadline has passed, the grades can be added or updated. Follow the below steps to grade assignments within CircuitVerse.
-
Click on My Groups to display the GROUPS page as shown in Figure 2.29. This page lists the different groups you are associated with.
Figure 2.29 -
Select the group to which you wish to add assignments and click on the View icon (refer to Figure 2.30) to display the next page for viewing your members and assignments.
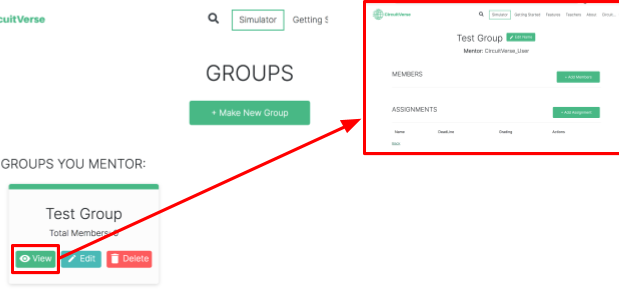 Figure 2.30
 -
Navigate to the Assignments section to view the list of assignments available for the selected group. Refer to Figure 2.31.
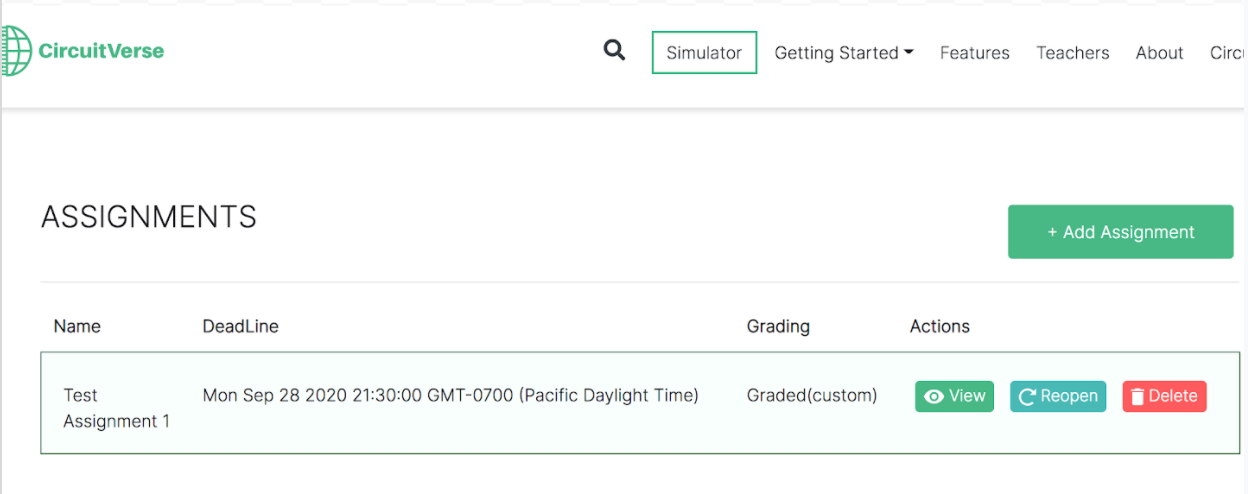 Figure 2.31
 -
Select the assignment that must be graded. Refer to Figure 2.32.
 Figure 2.32
 -
Click on View to launch the assignment details page. Refer to Figure 2.33.
 Figure 2.33
 -
Navigate to the Submissions section of the page to view the different submissions from the group members. Refer to Figure 2.34.
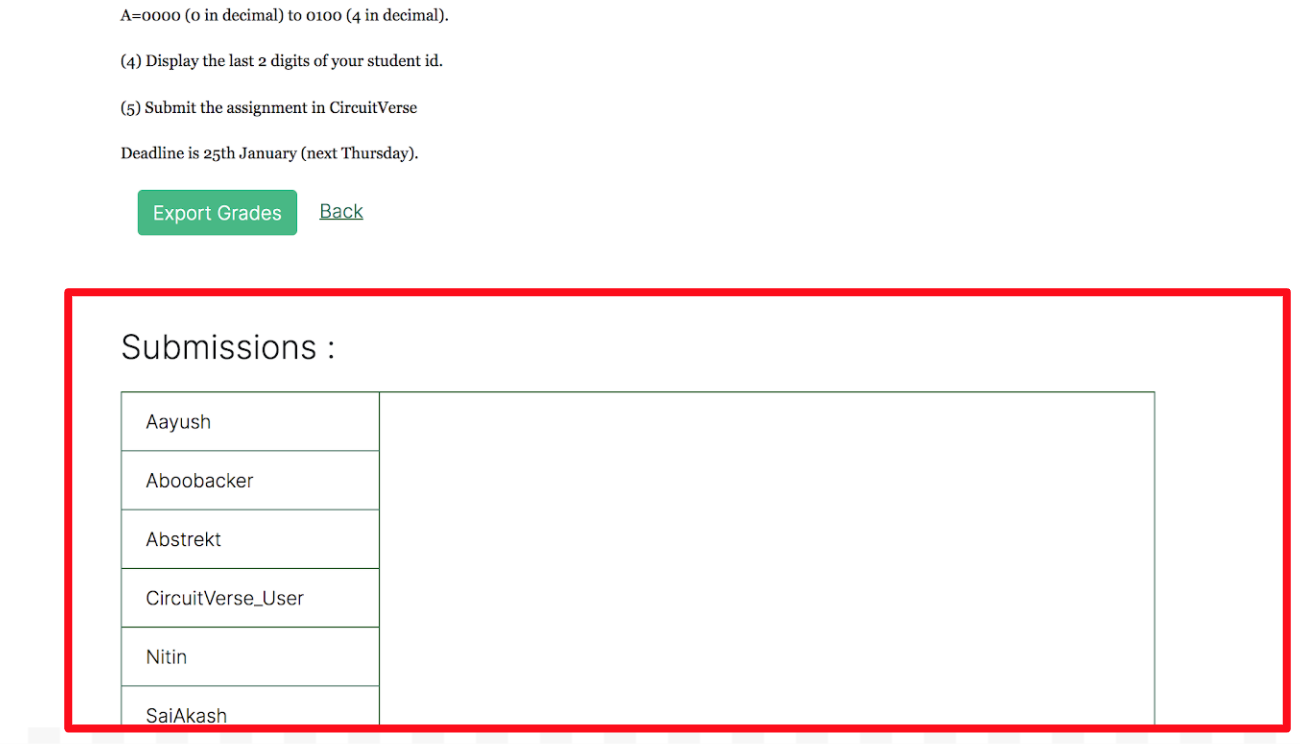 Figure 2.34
 -
Select a submission from the left-hand side of the member list and double-click on the selection to view the submitted circuit (see Figure 2.35).
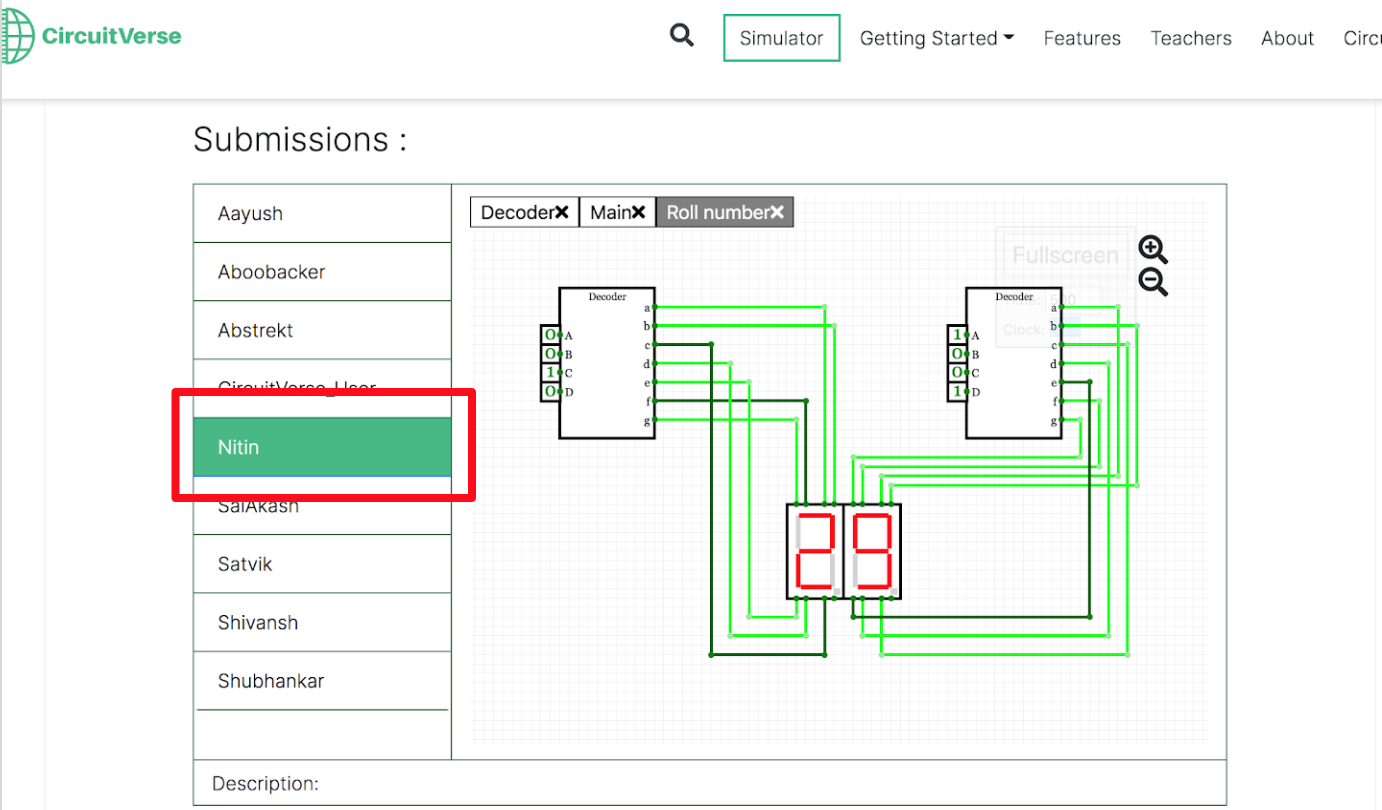 Figure 2.35
 -
Enter the desired grade in the Grade text field. If needed, add remarks. Refer to Figure 2.36.
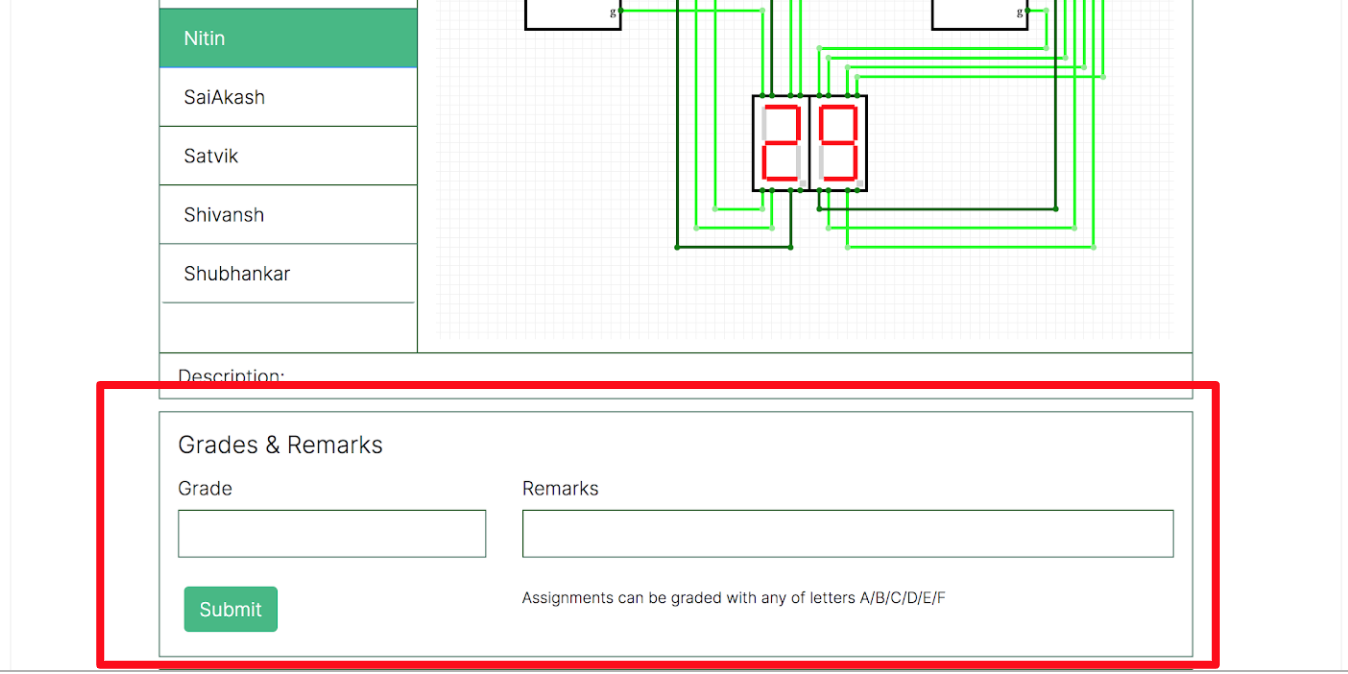 Figure 2.36
 -
Click on the Submit button (refer to Figure 2.37) to add or update the grade for the selected student for the relevant assignment.
NOTE: If a student has already been assigned a grade, the grade will be updated.
 Figure 2.37
Export Grades
After the grades have been assigned, a group mentor may choose to export the grades for a selected group in a CSV file format. Follow the below steps to export student grades for a given assignment:
-
Navigate to the student group for which the grades must be exported and click View to display the next page for viewing your members and assignments. Refer to Figure 2.38.
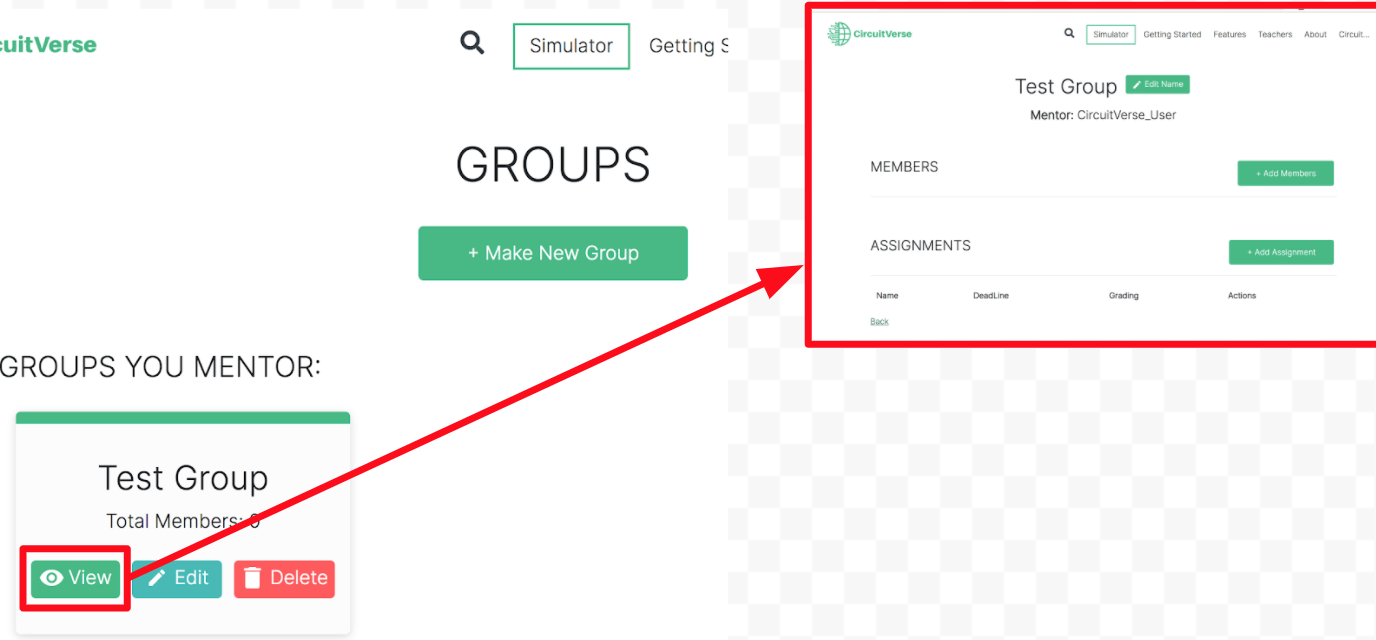 Figure 2.38
 -
Navigate to the Assignments section to view the list of assignments available for the selected group. Refer to Figure 2.39.
Figure 2.39 -
Select the assignment that must be graded. Refer to Figure 2.40.
Figure 2.40 -
Click on View to launch the assignment details page. Refer to Figure 2.41.
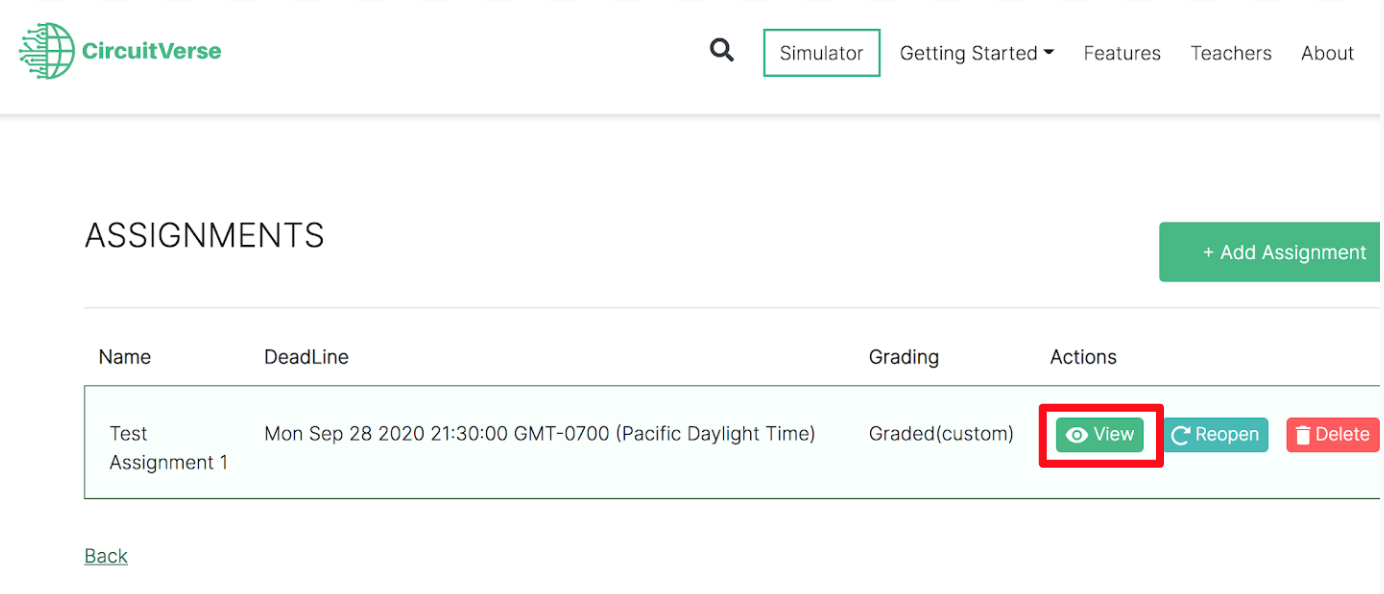 Figure 2.41
 -
Scroll down on the assignment details page and click on the Export Grades button to export the grades into a .csv file on your machine. Refer to Figure 2.43.
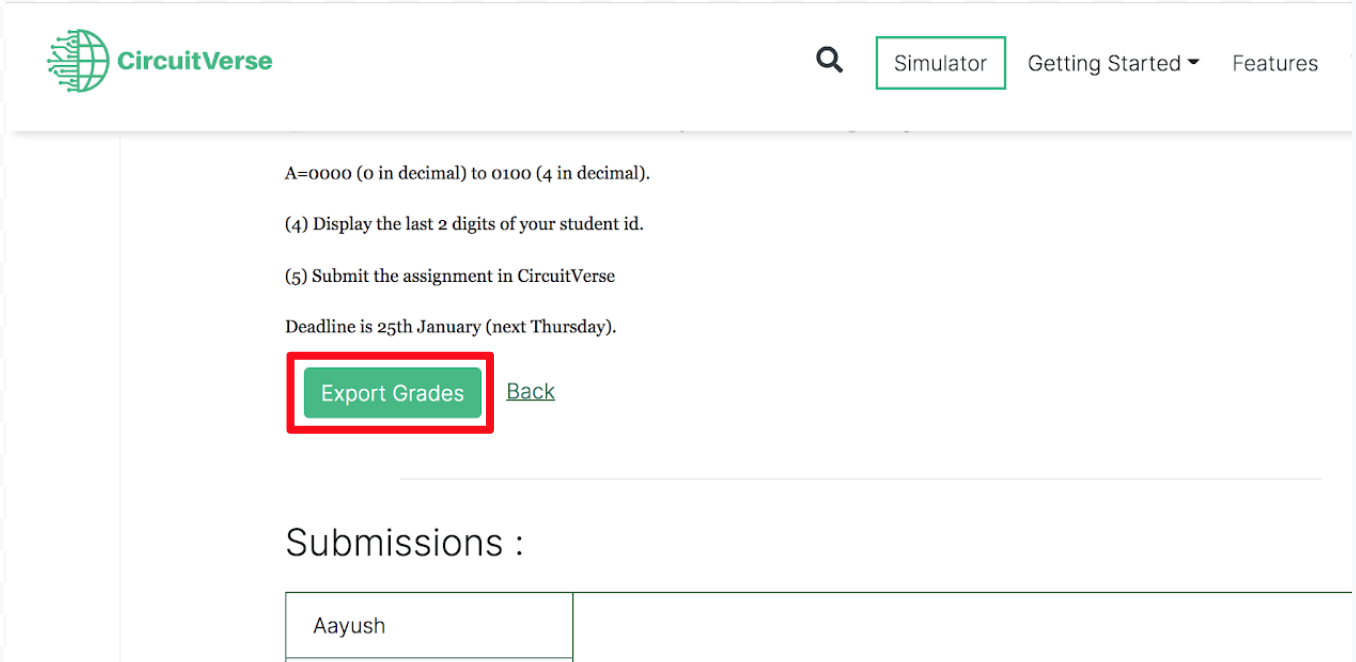 Figure 2.43
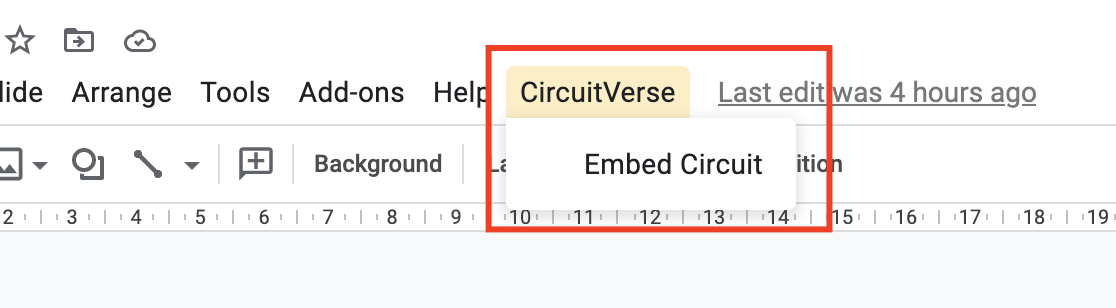
Embed CircuitVerse Simulation in Webpages
Since CircuitVerse is built using the HTML5 markup language, an iframe can be generated for each CircuitVerse simulation for embedding it within web pages and Google Slides.
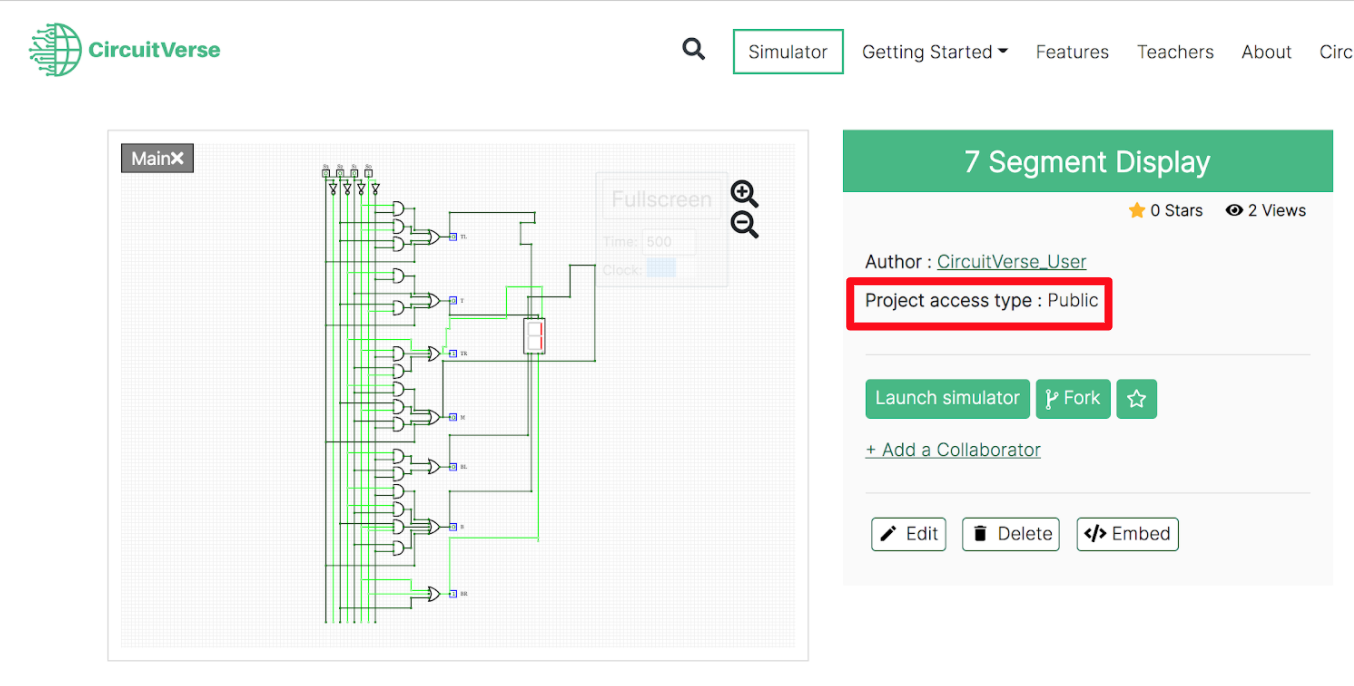
NOTE: The Project access type: property for the project that must be embedded must be set to Public. Refer to Figure 2.44.
Follow the below steps to embed a CircuitVerse simulation within a web page:
-
Navigate to your account displayed in the upper right-hand corner of your screen. Select Dashboard from the drop-down menu to display your dashboard. Refer to Figure 2.45.
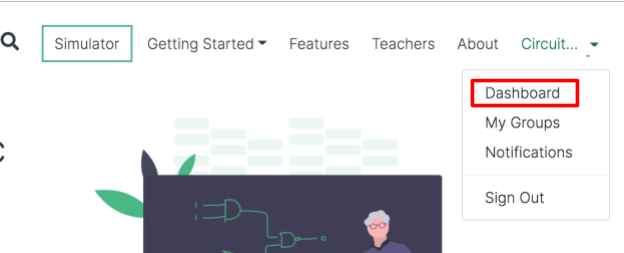 Figure 2.45
 -
Navigate to the project that you wish to embed. Refer to Figure 2.46.
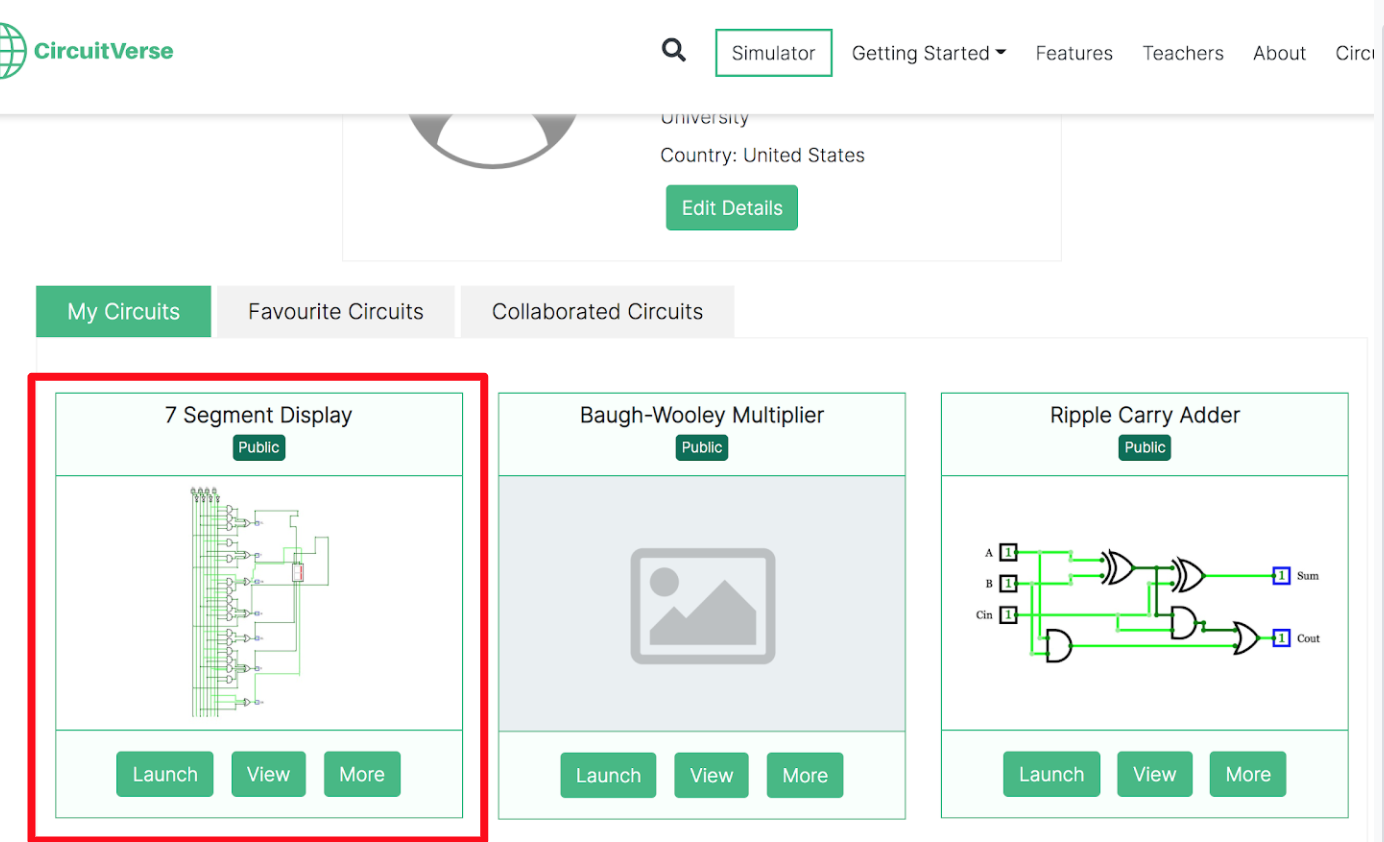 Figure 2.46
 -
Click on the More button to display the project details page. Refer to Figure 2.47.
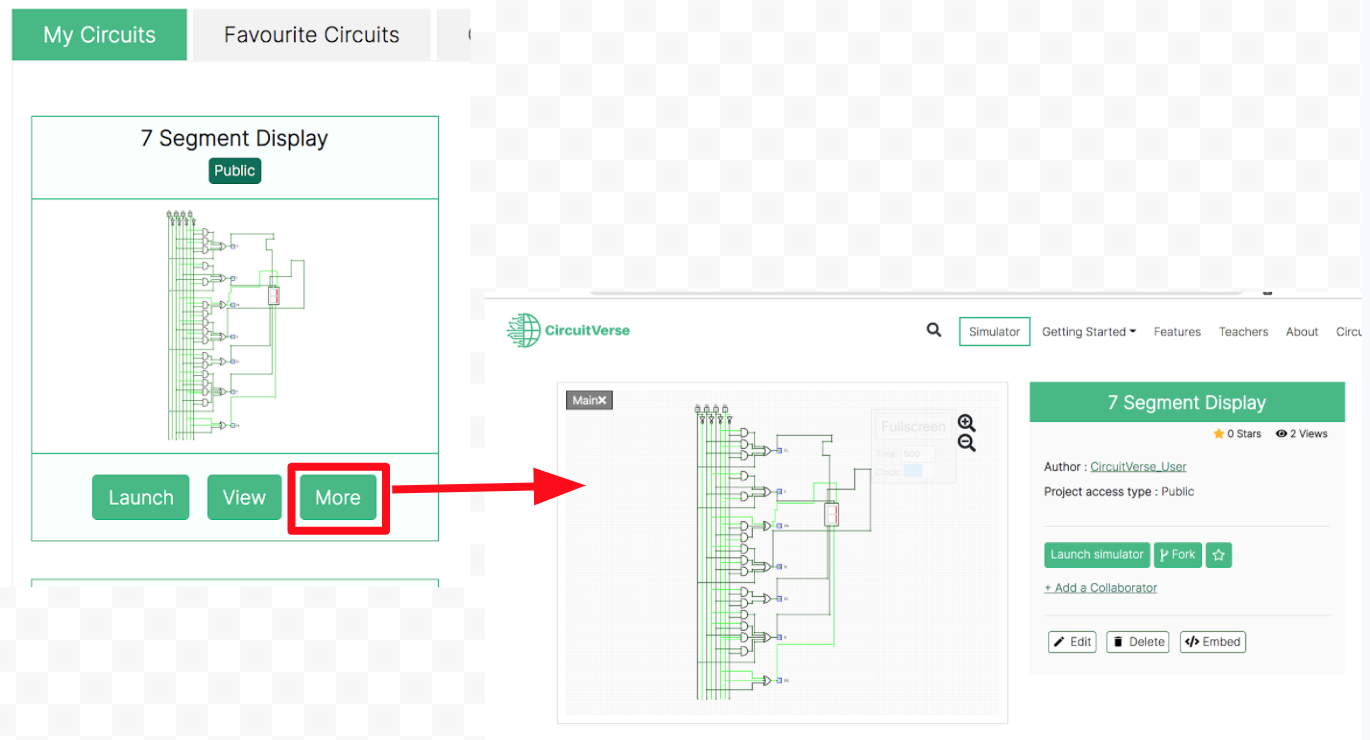 Figure 2.47
 -
Click on the Embed button to display the popup to customize the iframe associated with the relevant project. Refer to Figure 2.48.
 Figure 2.48
 -
Customize your project embed in the popup. You can customize height, width, border-width, border-color, and border-style. Refer to Figure 2.48.1.
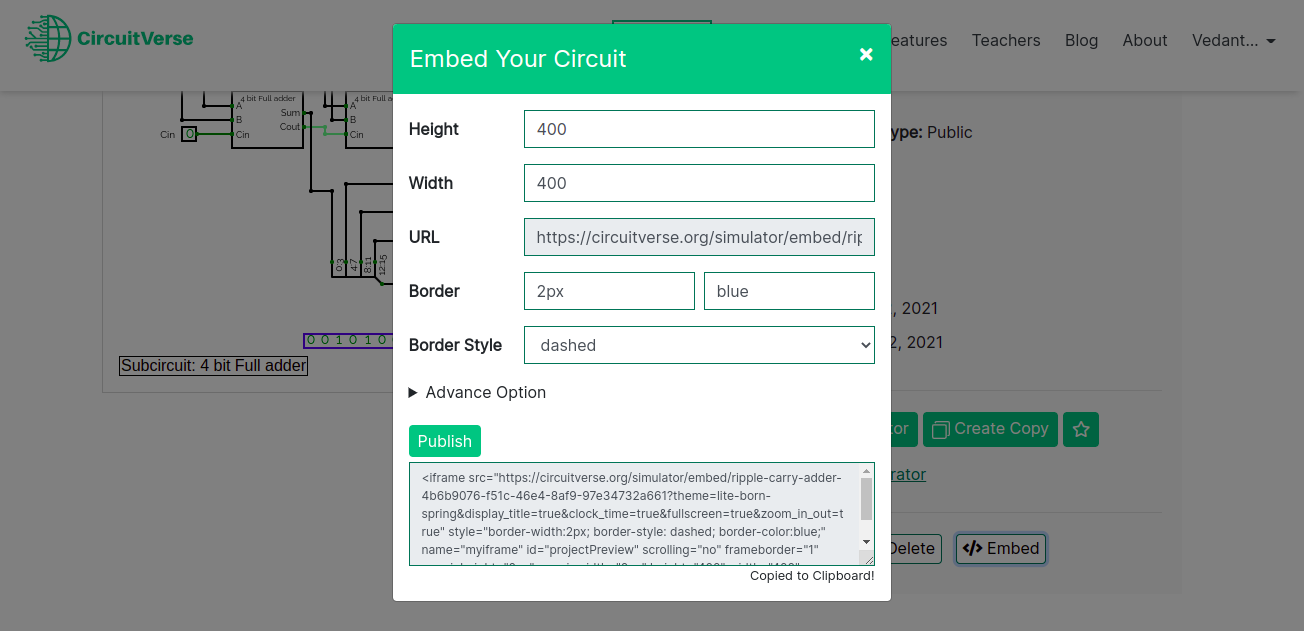 Figure 2.48.1
 -
For the advanced options, click on the Advanced Option and more options will be rendered. Refer to Figure 2.48.2.
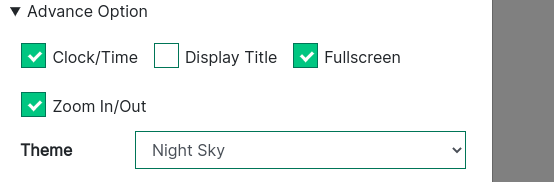 Figure 2.48.2
 -
Click on the Publish button to update the embed link with the updated changes in the configurations. The embed link will be copied to your clipboard and is ready to render/embed your circuit. Refer to Figure 2.48.3.
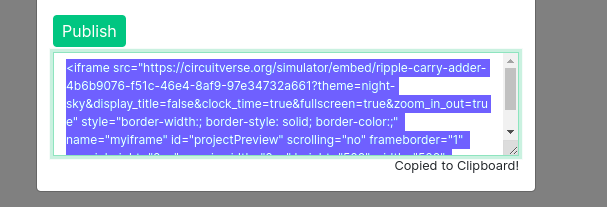 Figure 2.48.3
 -
Paste the iframe code within the HTML frame of the desired webpage.
 Figure 2.49
Embed CircuitVerse Simulation in Google Slides
Since Google Slides does not support live circuit simulations, CircuitVerse live circuits can be embedded in Google Slides after installing the relevant browser extension.
- CircuitVerse Chrome Extension: Download link
- CircuitVerse Firefox Extension: Download link
When the extension is successfully installed, it is displayed as an option in the menu bar. Refer to Figure 2.50.
NOTE: If the menu option is not available, then the Google Slides addon may not have been installed successfully.
Watch the below video for a quick demonstration of how the CircuitVerse Chrome extension works in Google Slides.
Download Image
CircuitVerse offers different options for downloading images in different formats and resolutions for reuse across different documentation projects (refer to Figure 2.51). Table 2.5 shares a brief description of the different image formats supported within CircuitVerse.
NOTE: Images for circuit simulation projects that are part of a CircuitVerse user account can only be downloaded. As needed, a user can fork an existing circuit contribution to add the CircuitVerse project to their dashboard.
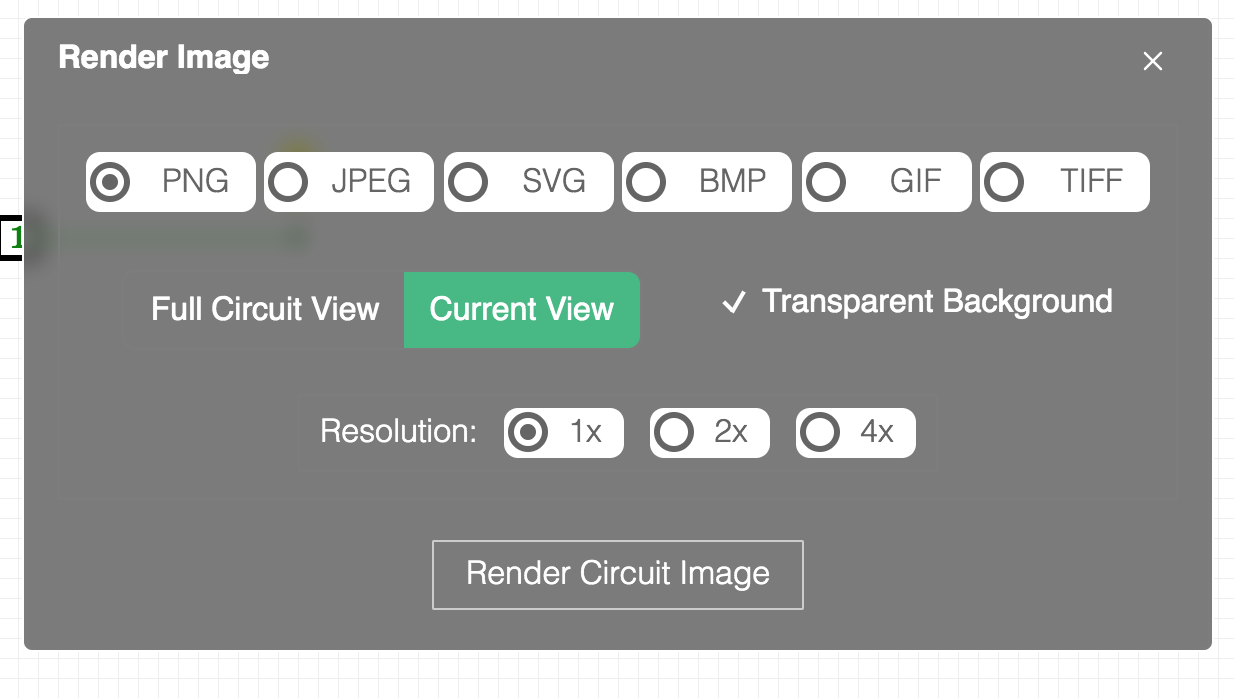
Table 2.5: Different image formats supported within CircuitVerse
| Name | Description |
| PNG | Renders image in PNG format. This is the default setting for rendering images in CircuitVerse. |
| JPEG | Renders images in JPEG format. This setting is widely supported across different browsers and applications. JPEG images are typically small in file size, making them ideal for email attachments and presentations. |
| SVG | Renders images in SVG format. This setting is recommended for web pages and animations. |
| BMP | Renders image in BMP format. This setting is recommended for high-quality scans and archival copies. BMP files are typically high in quality and have a large size. |
| GIF | Renders image in GIF format. This setting is recommended for web images and animations. GIF files are typically small in size. |
| TIFF | Renders image in TIFF format. This setting is recommended for high-quality prints, professional publications, and archival copies. |
Besides rendering images in multiple formats and resolutions, CircuitVerse images can be downloaded in multiple views (with or without transparent background) to suit one's image needs (refer to Figure 2.51). Table 2.6 shares a brief description of the different image views supported within CircuitVerse.
Table 2.6: Different image views supported within CircuitVerse
| Name | Description |
| Full Circuit View | Displays the full circuit view of the displayed image. The simulator zooms in or out of the current view so that the circuit image fits the entire screen. |
| Current View | Displays the image captured in the current simulator view. This is the default selected view for rendering images. |
| Transparent Background | Reproduces the image with a transparent background. By default, this setting is not selected. Note: This setting only works for the PNG format because only PNG supports a transparent background. A transparent background image rendered in CircuitVerse does not have a white background. |
| Resolution | Renders the image for different resolution settings. While 1x is the default setting, for higher-resolution images, the other options (2x and 4x) can be selected. |
Follow the below steps to download an image from the CircuitVerse simulator:
-
Navigate to the circuit design that must be downloaded. Refer to Figure 2.52.
 Figure 2.52
 -
Click on the Launch Simulator button to launch the circuit simulation in the CircuitVerse simulator. Refer to Figure 2.53.
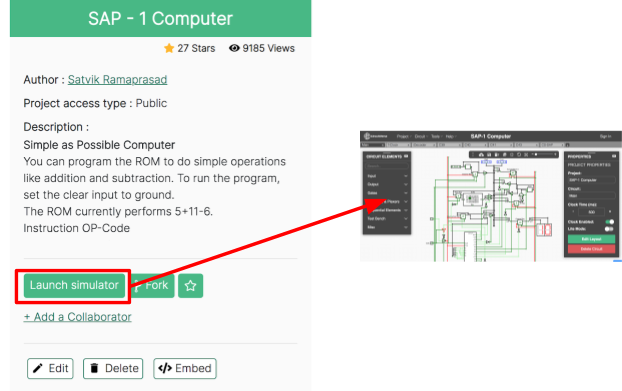 Figure 2.53
 -
Click on the Download Image icon displayed in the quick access toolbar. Alternatively, you can navigate to the Tools drop-down menu available in the menu toolbar and select Download Image. Refer to Figure 2.54.
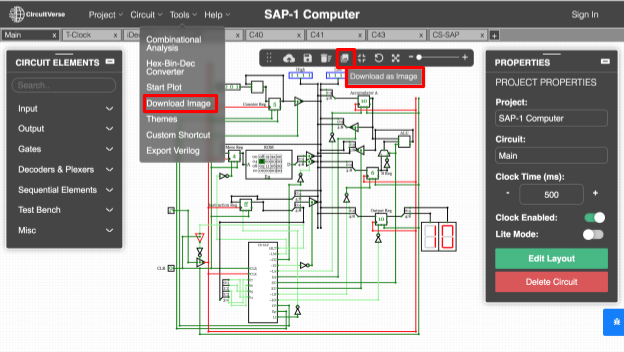 Figure 2.54
 -
The Render Image pop-up window is displayed (refer to Figure 2.55).
Figure 2.55 -
Select the relevant settings for your image on the Render Image window. Table 2.5 gives a brief description of the different settings available on the Render Image window.
-
Click on the Render Circuit Image button to download the image on your machine. (Refer to Figure 2.56)
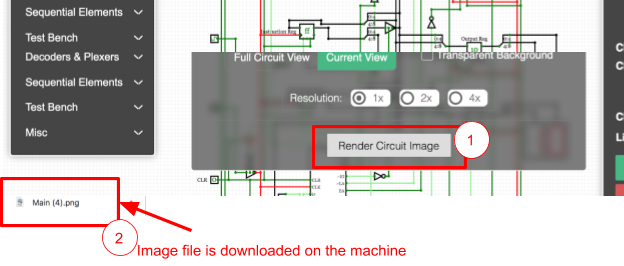 Figure 2.56